Car diagnostic tools information by obd2tool

Aller au contenu | Aller au menu | Aller à la recherche

Auto Scanner Tools

Fil des billets

dimanche, janvier 30 2022

Use a Laptop As an Automotive Scan Tool Instruction

Modern automobiles come equipped with an On-board Diagnostics system. OBD-II is an advanced management system that professionals and home mechanics can connect to via the diagnostic port. You can also use a computer or laptop instead of a handheld scanner, however, you will need a kit. Most laptop diagnostic software is more advanced than handheld scanners, offering the ability to monitor engine performance, as well as read trouble codes.

Step 1 Purchase a laptop OBD-II interface kit. You can purchase these kits at many automotive parts stores; in addition, they are available online. Step 2 Insert the software installation disc. Follow the prompts to complete the installation. If the installation does not automatically begin, access “My Computer” and double-click on the disc to start. Step 3 Connect the components to your laptop. Most kits contain a USB to serial adapter for laptops without serial ports. Once the device is attached to the laptop, connect the OBD-II diagnostic port cable. Step 4 Start the software program. Double-click on the desktop icon if the program did not automatically start. Get comfortable with the control interface. Step 5 Bring your laptop to your vehicle. Turn the ignition key to the “On” position, but do not crank the engine. Connect the Car Diagnostic Tools scan cable from the laptop to the diagnostic port on your vehicle, usually located in the driver’s side foot well, below the steering well. Click the “Scan” button on the control interface, if required. View the engine codes and diagnostic information provided by the program.

Launch X431 Perform ECU Backup Memory ClearInitialization

Launch X431 ECU backup memory clear function locates at TOYOTA diagnostic S.W–>ABS–>work support. TOYOTA-16 or CAN BUS connector is selected for the vehicle without CAN system, while CAN ABS II connector is selected for the vehicle with CAN system.

Launch X431 Toyota Related Topics:

Toyota Yaw Rate Acceleration Sensor and VSC Light Reset by Launch X431 Toyota Crown 2013 All Keys Lost & Remote Programming by Launch X431

More topics about Launch X431 check here: How to use Launch X431

The following is the operation procedure:

Background for back up memory: ABS ECU includes main control function, self-diagnosis function and fail-safe function. When a malfunction in the system is detected, A DTC will be stored into the back up memory, warning lamp light on and the system is deactivated by switch off fail-safe relay. In this case, ABS system will operates as general brake system. If the malfunction disappears, the ABS will be active again, although after the stored DTC is cleared, the ABS warning will not be off. At this time, mode change function will be performed to extinguish the warning lamp. The procedure of clear back up memory is easy:

Please select “Yes” in the Step 1/2 fig. to clear back up memory, then clicks “OK” in the Step 2/2 fig.

Notice: VSC/ABS/EBC warning lamp will come on after performing this function. It will not be off after the DTC is cleared, you should perform as following:

Mode Change procedure:

a)Please switch ignition key to OFF when warning lamp comes on;

b)Ignition on, then enter into X431� ABS �work support;

c)Select(click) MODE change menu

Select(click) NO to enter CHECK MODE;

d)At this time, ABS/VSC/ECB warning lamp will flash, if no flashing, please repeat above procedure until ABS/VSC/ECB warning lamp flashes from in 1Hz to in 4Hz.

<note> 1Hz = setting

e)The process will take about 1 minute less or more depending on vary vehicle.

f)To extinguish warning lamp, please operate X431 into general mode (or change into general mode automatically by switch ignition key to OFF).

Click “OK” to change into general mode:

samedi, décembre 18 2021

Autel MaxiVideo MV480 Digital Videoscope Unboxing Review

Autel MaxiVideo MV480, the next generation of digital videoscope, is ideal for inspecting difficult-to-reach areas with its semi-rigid flexible cable and 10-level adjustable LED light. It features dual front and side cameras with 1920×1080 high resolution, a 4.1″ 1200×720 full color LCD display, an 8.5mm camera probe, and a built-in 2600mAh battery with up to 4 hours continuous use. This multipurpose videoscope is an economical solution to inspect machinery, facilities, and infrastructure in the safest, quickest and most cost-effective manner possible. Autel-MaxiVideo-MV480-Digital-Videoscope-Unboxing-Review-1

Autel MaxiVideo MV480, the next generation of digital videoscope, is ideal for inspecting difficult-to-reach areas with its semi-rigid flexible cable and 10-level adjustable LED light.

Highlights: 1. High Resolution Images and Videos (1920 x 1080) 2. 4 Hours Working Time. Built-in 2600mAh battery with up to 4 hours continuous use 3. Support Multi-Language: English, Spanish, Portuguese, Italian, Duth, German, Polish, French, Janpanese, etc

Comparision of MV400 vs MV500 vs MV480 vs MV460 vs MV160 MaxiVideo

MV400 MaxiVideo

MV500 MaxiVideo

MV480 MaxiVideo

MV460 MaxiVideo

MV160 High resolution and full color digital LCD display 3.5″ (320×240) 5” (1280×720) 4.1″ (1200×720) 3.5” (640 x 480) Smartphone-based Record and play back high resolution still images and videos 640×480 1280×720 1920 x 1080 1920 x 1080 1920 x 1080 Wireless monitor enables remote viewing – √ – – – Touchscreen for convenient operation – √ – – – Single button for quick photo and video recording – – √ √ √ Add audio annotation for detail presentation – √ √ – √ On-screen photo editing and markup – √ – – √ Dual cameras see straight ahead or at a 90° angle – √ √ – – Digital zoom for detailed viewing 5× 5× 7× 7× 7× View objects as close as 1″ √ √ √ √ √ BOn-screen horizontal/vertical reverse √ √ √ √ √ On-screen 90° clockwise rotation – √ √ √ √ Built-in & adjustable LED illuminates viewing area √ √ √ √ √ HDMI port for monitor view – √ √ √ – Mini USB connector for uploading images and videos √ √ √ √ – 1 m long semi-rigid flexible watertight shaft √ √ √ √ √ Narrow probe diameter available in both 5.5 mm and 8.5 mm √ 8.5 mm 8.5mm (5.5mm Optional) 8.5mm (5.5mm Optional) 8.5mm (5.5mm Optional) Micro SD card slot for greater memory capacity √ √ √ √ – Oil and scratch resistant tempered glass lens √ √ √ √ √ Ergonomic and durable tool housing √ √ √ √ √ Built-in rechargeable Li-ion battery √ √ √ √ √ Multilingual support √ √ √ √ √ Water Resistant Camera head √ √ √ √ √

Features: 1. High resolution images and videos (1920 x 1080) 2. Dual front and side cameras for wider viewing angle 3. 4.1-inch full color LCD display (1200 x 720) 4. 1-button quick image capture and video recording 5. 70-degree field of view for expanded viewing angle 6. Adds audio annotation for detailed review 7. Micro HDMI-output enables streaming to larger monitors 8. Freeze-frame camera stills or video recording 9. On-screen horizontal/vertical reverse 10. Records and plays back images and video clips 11. 7X digital zoom for increased viewing 12. 8GB Micro SD card (included), supports up to 128GB 13. Mini-USB cable (included) for uploading images and videos 14. More than 10,000 lux, adjustable 10-level LED illumination 15. Flashlight for higher visibility in low-light environment 16. Built-in, rechargeable 2,600 mAh battery for 4 hours of continuous use 17. 1m (39.4″) semi-rigid, flexible watertight cable 18. Includes magnet and hook cable accessories 19. 8.5mm (0.33″) probe fits most spark plug holes 20. Compatible with 5.5mm (0.22″) camera head (not included)

Autel-MaxiVideo-MV480-Digital-Videoscope-Unboxing-Review-2

Product Display:

Autel-MaxiVideo-MV480-Digital-Videoscope-Unboxing-Review-2 Autel-MaxiVideo-MV480-Digital-Videoscope-Unboxing-Review-5

Package List:

1x MV480 main Unit 1x Magnet and Hook 1x Imager Heads and Cable (8.5 mm) 1x User Manual 1x Protective carrying case 1x Micro SD card 1x Charger 1x RS232 Serial Cable 1x Mini USB Cable

Autel-MaxiVideo-MV480-Digital-Videoscope-Unboxing-Review-6

How to Use Scania SDP3 Set Speed Limit for Scania Truck

Here is a step-by-step guide on how to use Scania SDP3 diagnostic software to do Speed Limit setting for Scania truck.

Preparations: Scania SDP3 V2.48.2 Diagnostic Software Free Download

Steps:

Plug the Heavy Duty Scanner Scania VCI3 Scanner to this Scania via OBDII port and don’t forget the passenger PIN code. Scania via OBDII port

First turn on the car. Run SDP3 app. Enter “Checks and adjustments”. The loading process may take a few minutes.

Go to FUNCTIONS>>Adjustment Unfold Performance>>Vehicle speed Select “Speed limiter” “Adjust maximum speed” and click on “Change”.

As the customer required, we set it from 85 to 50 km/h and click on “Execute”.

Done! Nice and simple! If the car drives over 55 km/h, it will automatically adjust to less than it.

samedi, octobre 30 2021

2021 Toyota Techstream 16.00.020 15.20.015 Free Download

Toyota TIS Techstream is Toyota’s diagnostic system,it currently supports scantool diagnostics and/or vehicle reprogramming of Toyota, Scion, and Lexus vehicles. In this article I will share the Toyota TIS Techstream Software Free Download Link.

Toyota TIS Techstream Function Feature List: System Selection:

  • Heath Check
  • Customize Setting
  • ECU Reprogramming
  • CAN Bus Check

System Connection:

  • Trouble Codes
  • Freeze Frame Data
  • Data List
  • Custom Data Lists
  • Graphing
  • Active Test
  • Monitor
  • Utility

Software Release Notes Version Software Last Updated: 4/24/2019:

2019 and Earlier Model Years All Models are currently supported

2020 Vehicle Coverage ’20MY Lexus ES200/250/260/350/300h GS300/350/GS F GX460 IS300 LC500/500h LS500/500h LX570/450d NX200/300/300h RC F RX300/350/350L/450h/450hL UX200/250h/260h ’20MY Toyota 86 4Runner Avalon/HV Avanza Camry/HV Corolla/Hatchback/Sport/HV Hiace Hilux Land Cruiser 200 Prius/PHV/Prime/C RAV4/HV Sequoia Sienna Tacoma Tundra Yaris Sedan/R

Toyota Techstream 16.00.020 released 11.03.2021

https://disk.yandex.com/d/uwmVBJUe3pf6_w

Toyota TIS Techstream V15.20.015 Free Donwload:

https://mega.nz/file/NVA1QSaJ#SEOAp7iddrSiLUqWoA8etDY8P-tpvAtGUU1Aoq2bD1c (password limited by original owner)

Toyota TIS Techstream V15.10.029 Free Donwload:

Yandex: https://yadi.sk/d/uRvugkDm1riDWg

Mega: https://mega.nz/file/qNQQjKZK#4PWhNWBExyKqW6ocFP3PUNB8myeaocBBfxDYMEHSXGo

No password limit

Toyota TIS Techstream V15.00.026 Free Donwload:

https://mega.nz/#!qApUXaBK!IkpfK4_ycZGyhEqf4k-l0crMyCqfInx2aSyvgk8uoGQ

Toyota TIS Techstream Software Installation Guide:

Toyota TIS Techstream Installation Guide

Toyota TIS Techstream Cable:

And here are some real cases about Toyota TIS Techstream DIY Guide:

Toyota TIS Techstream Program A New Key For Lexus ES330

Program New Key for Toyota Tundra by TIS Techstream

How to Reset Toyota Password/Immo code with Techstream

Techstream Program TPMS Sensor for Toyota Tacoma 2015

jeudi, octobre 7 2021

How to Read/Write Eeprom 93c76 by XTOOL X100 PAD2

XTOOL X100 Pad2 with Eprom adapter work Well,. Read / Write

EEPROM 93c76 ( immo off Skoda Fabia 1.4i 2002-2003).

Xtool can do immo off?

– Only read, write eeprom, modified in the program immo decoding 3.2.

My Tis one is eprom 93c56.

I tried Nissan Micra 93c66, all right, Read and Write

Hope it helps!

How to reset Passat 2008 ABS/ESP light By Autel MaxiSys MS908P

This Passat you activate the ABS every time you would put your foot on the break, this until the ABS, ESP and Brake light was illuminated… A quick scan revealed 00290 by using Autel MaxiSys MS908P… But, was this a sensor problem? Follow me on this article to find out what was the problem and how to resolve it.

Car model and year: Volkswagen Passat 2008

The issue:

After starting the engine,

ESP light on

ABS light on

Parking brake light on

Passat Scanner to use: Autel MaxiSys MS908P

I’ve already scanned the car, the ABS code is 00290 (left rear ABS wheel speed sensor implausible signal).

when I drive the car, one of the things I notice is as soon as I put my obviously now it doesn’t do it because there is a fault, if I clear the fault, the fault goes away, and when I drive the car as soon as I press the brake I can feel the ABS pump working and I can feel it on the pedal and I can hear it and every time you break and you carry on doing this a few times until it daily triggers the light.

What says in Autel MaxiSys MS908P, there is implausible signals, so the pump or the unit is getting a signal from the sensor. However, when you first press, if I clear the codes when I first press the brake. The unit will get the signal, something the wheel is sleeping or whatever and he’s going to obviously do what he has to do, only a few times later, because it’s always the same thing, the unit is programmed to obviously. See that something is now right and trigger the fault, and that’s the reason why it took me a little bit to make the lights come on.

Driving the car.

We go but they eventually come on as you’ve seen, so, another thing is and let me show you because while I was there driving I did a little bit off.

Enter ” Data Manager”.

And then “Review Data, then “Volkswagen”.

I can only do three here.

I can only do next frame, anyway I took some live data and as you can see I have my front car, I can only have three, so I have my front right, speed rear left and rear right so the rear left is going to be my green and then so that should be the one that I needed to look at and as I start to go, so I was driving the car.

Start the drive. And then look at that the green line.

I think it’s quite self-explanatory what’s going on.

That sensor is breaking either that or a wiring problem, so the sensor is reading and dropped.

Reads again then drops all these is dropping.

So is dropping at a certain speed, so either we have a sense of problem or we have a wire problem, most likely this answer because otherwise wouldn’t read nothing at all I would say, but we don’t know that yet.

So my next step is going to be take the wheel out take this sensors and do an inspection and go from there really now at the moment.

I think we easily established that the problem is going to be somewhere on the signal from the sensor to the ABS or the sensor itself.

Okay guys problem found so the first thing I’ve done was obviously take the sensor off.

You can easily see that the sensor has been rubbing on the magnetic reflector ring. It’s

marks there now when I cross a magnet in front of this which I have one here.

Okay, obviously it’s too big, but I can easily make a numbers to appear on the speed of these wheel, quite erratic but doesn’t matter, it is working cable looks okay, connection looks OK.

So because of the state of this disk and in the fact I was touching what I decided to do was to put the camera, the Autel scope camera there and the hole of where the sensor is and that’s exactly what I’m going to show you now, so that’s the magnetic ring now I’m going to turn the wheel, I know the light is not brilliant, let’s see if I can be slightly different, let me actually put the phone down I can actually look at this properly.

There we go, so I’m going to rotate the wheel.

Okay, so to start with I don’t know if you can see there is a crack where is it okay, I’ll go this way, so quite a little bit of damage in there.

oh, look at that: another crack in there, not very good, it’s a really bad, another crack right there.

Another libya missing there.

And this is the worst point, look at that, so the magnetic layer look at that there is and then there’s there.

You just finished look the other way. It’s missing, you can see how bad it is. It’s completely gone.

So when he goes through this area here is when he fails to read look all gone and then comes up again, you can see there.

Then you have the ring again, if I go back.

it literally needs a new hub, a new bearing as far as I’m aware, this is attached, is one of those bearings with the reflector ring at the back, so it’s going to need a new hub, there’s nothing else I can do, most likely still okay, so we’re gonna get a hub and when I get a hub and replace it test it.

and should be about it really I think.

Good I have the camera, otherwise it will be very difficult to spot and hold bank it would be a little bit more tricky to diagnose but they we go there, we know what the problem is now that’s going to get the parts and get these going.

And there is a brand new one, so let’s gonna crack on with this and get it replaced.

Right, caliper is out honestly this car is in need of a break job to be honest with you it’s really bad, right now we’re going to take the carrier, so we can then take the disc and then have to take the bearing.

Okay, and he was definitely a challenge to take the carrier out ready hurt myself

And funny enough I didn’t even hurt myself here, hurt myself closing the drawer on the Van, radio anyway so that’s out was definitely a challenge to take these two bolts from the carrier, the bearing I think just a spur the camera.

That we’ve seen: no rocket science.

Just come out.

so the new bearing, so just curiosity comes with a new cap comes with a new bolt so we’re not going to reuse the bolt it comes with a new bolt.

And I’m going to put everything back on, I’m not going to take you through the law, I’m just literally gonna put everything back on. I’m going to probably take the calipers give you a good clean and a little bit of Chris at least on this side because I’m touching it.

For now I’m going to put everything back on because it’s getting dark even though it might not look on the camera but it’s getting dark and I want to get things done today and tomorrow, I’ll try the car tomorrow morning, but yeah for now I’m not going to take you through anything else just put everything back on.

Alright, I’m glad I did the thing yesterday because.

right, let’s go to clear these lights to start with a vision clear the car yet so I’m going to clear the lights and then we’re gonna go for a drive and fingers crossed, the problem is solved.

Okay, we cleared fault free let’s go.

Okay, first thing: no lights; secondly, I definitely can see oil I can’t feel that and what you call it I can’t feel the pedal a vibrating anymore, so there is no activating the ABS, anymore, when I press the pedal which would happen like.

Even like now if I press the pedal I could feel it, it’s absolutely perfect now, no lights come back on everything’s good.

I’m just gonna turn around and load the live data from Autel MaxiSys MS908P once more, just curiosity really because I know we fixed, but just to show you guys, I’ll show you the live data just for you to see that and this is OK now, so let me just turn around here and I’ll show you.

Okay, so here we have it so real left as you can see up there is the green line, so I’m going to start to drive.

There we go. I think is self explanatory. Beautiful.

That’s it.

And back home and ready to move to the next, and last issue with this car, so stay tuned, but for this one guys as you’ve seen problem is fixed cars driving absolutely spot on and in the end was just that reflector ring on the bearing, sensor is OK, the sensor is the same one as before, and yeah that’s it guys, we got it fix.

One thing that I would probably say is that the way I look at this unless the other side has been changed recently it might be very close to having the same who knows, but for now he’s fixed guys and that’s the main thing, so that’s gonna wrap up these guys, I hope you enjoy this article, hope there’s some information, whatever you’re going to find useful.

Enjoy!

jeudi, septembre 30 2021

What’s the difference between ford jds and ids

Hi. What’s the difference between ford jds and ids ? Which one I would need to program a smart key fob for 2018 expedition for example ? Or If I want to program new ecu weather from junk yard or New one from the dealer What tools I need ? I have Autel j2534.

Answered by JohnH930

Integated Diagnostic Software (IDS) – The factory Ford Motor Company vehicle diagnostic software provides complete dealership level vehicle diagnostic coverage for all 1996 to present Ford, Lincoln and Mercury vehicles. IDS is a flexible diagnostic tool that utilizes standard computing platforms to work with Ford’s VCM, VCM II, VCMM and VMM devices. The IDS software license includes time based access to the IDS software, software udpates and calibration files.

Ford J2534 Diagnostic Software (FJDS) – The factory Ford Motor Company vehicle diagnostic tool designed for use with J2534 compatible Vehicle Communications Interfaces (VCI). FJDS software provides module reprogramming software (FMP) that covers 1996 to present Ford, Lincoln and Mercury module reprogramming functions, plus complete dealership level diagnostic software for all 2018 to present Ford and Lincoln vehicles. FJDS is a flexible diagnostic tool that utilizes standard computing platforms to work with Ford’s VCM II or J2534 compatible devices. The FJDS software license includes time based access to the FJDS software, software updates and calibration files.

Ford Diagnostic & Repair System (FDRS) – The next generation factory Ford Motor Company vehicle diagnostic Software designed for use with VCM II, VCMM and J2534 compatible Vehicle Communications Interfaces (VCI). FDRS provides complete dealership level vehicle diagnostic coverage for some 2018 and forward vehicles. FDRS provides superior capabilities, is more user-friendly and provides more diagnostic tools than IDS. The cloud-based system ensures the technician is provided the latest software every time FDRS logs into the Ford network.

https://fordtroublerepair.blogspot.com/2021/08/whats-difference-between-ford-jds-and.html

dimanche, août 1 2021

Autel MaxiDiag Comparison MD808 PRO VS MD808 VS MD802

Autel MaxiDiag Comparison: Autel MaxiDiag MD808 PRO vs Autel MaxiDiag MD802 (All System) vs Autel MaxiDiag MD808 vs Autel MaxiDiag MD802 (Four System) Model Autel Maxidiag MD808 PRO(All System) Autel Maxidiag MD802(All System) Autel MaxiDiag MD808(Four System) Autel MaxiDiag MD802 (Four System) Throttle Match Function √ System Coverage All System All System Engine.Transmission.

ABS.SRS Engine.Transmission.

ABS.SRS Steering Angle Learning √ √ DPF Functions √ √ Battery Registration and Reset √ √ Read/Erase Codes √ √ √ √ View Freeze Frame Data √ √ √ √ View Live Data √ √ √ √ View Vehicle Information √ √ √ √ View 1/M Readiness Status √ √ √ √ On-board Monitor Test √ √ √ √ 02 Monitor Test √ √ √ √ Modules Present √ √ √ √ Component Test √ √ √ √ EPB Brake Pads Replacement √ √ √ √ Oil Service Reset √ √ √ √ Save and Playback Data √ √ √ √ DTCs Help √ √ √ √ Print Data via Windows-based PC √ √ √ √ Display 800 x 480 LCD 320 x 240 dpi 800 x 480 LCD 320 x 240 dpi Memory 32M+16G 32M+16G 32M+16G 32M+16G Power Consumption 1.7W 1.7W 1.7W 1.7W Weight 313 g (0.69 lb) 280 g (0.62 lb) 313 g (0.69 lb) 280 g (0.62 lb)

Autel Maxidiag MD808 PRO Compare with Autel MD802:

1. Autel MD808 PRO is the upgrade version of MD802, which covers more cars and more systems. 2. Autel MD808 PRO support Steering Angel Learning, DPF functions, and Battery Registration and reset. MD802 didn’t have these functions 3. Autel MD808 pro is not just a diagnostic tool, but a professional service tool to service individual specialized systems, including Oil Reset, EPB, SAS, BMS, and DPF, offers a quick and easy solution to everyday task in the workshop; The ARM Thumb Processor (400 MHz) needs only 6s booting time to allow you to build a more fluid user experience. 4. For MD808 PRO, Live data graphing for all available modules. 5. Brand New Design: Autel MD808 pro, a revelation in diagnostic and service tool is launched with the brand–new exterior in terms of design, structure, and buttons; 6. Efficient Diagnosis: MD808 PRO Offer more advanced features and functions to troubleshoot basic four systems (Engine, Transmission, SRS, and ABS) for major vehicles on the road today; 7. Powerful Hardware: MD808 PRO Included with 16G Micro SD Card, full color 800*480 display to take your diagnostic experience to a whole new level;

VVDI Prog, KTP and Autel Program 2004 Mercedes Benz C240 AKL all keys lost

Today, I’m working on a 2004 Mercedes Benz C240 with all keys lost with Xhorse VVDI Prog, VVDI Key Tool Plus (short as KTP), Autel MaxiIM IM608 with XP400 PRO, I took out the EIS cause I tried to calculate password with Autel, but it tells me it will take 20 minutes to 420 minutes, quite frankly I don’t have time for all that nonsense at all. As you can see, it is 209 EIS, funny thing is about this particular yeah won’t be reading it as a tool that has different variations of this adapter.

I will be reading with this adapter W209 /211 ZGW.

We also have this one W209 /211 (HG12).

And will use W211 ST12 adapter, and put it into the adapter W211 (ST12).

We’re gonna read with url=https://www.obd2tool.com/goods-...Xhorse VVDI Prog/url.

We’re back once I have everything setup, the EIS is on the adapter perfectly.

So now, I’m gonna put it into VVDI Prog, to plug the cable to the adapter W211 (ST12). And the plug the power adapter into VVDI Pro.

To read with VVDI Pro successfully.

Then, click on “Verify”

Then save as C240 EEP.

Click on “Flash”, and then “Read” until succeed, then “Verify”.

Then, save as “C240 flash”.

Awesome, so now I have both of those files, so what I’m gonna do is to transfer them both to VVDI Key Tool Plus.

This is the key to be programmed.

Go to “Immo programming” ->> “Europe” ->> “Benz” ->> “Select from system” ->> “Prepare Key File” ->> “Start Programming” ->> “Prepare key file” ->> Click OK to load the EIS file with password (support Motorola EEPROM data).

Go to “EIS” -> “20345605” ->> C240 eep.bi

Click on “Yes”.

Please confirm the key password, tap “OK” to continue.

Select V051 type of the generated key file, or you can choose more than one.

Calculating, require 30 seconds, query after 5 seconds…

Click “OK” to select the path to save the file.

Click on “Save here” and then “OK”

Preparing 1 key, 2 key, 3 key, 4 key, 5 key, 6 key, 7 key, 8 key …

Okay, key file generation completed, the saved path is : local file / MB/ KeyFile/20345605.

Back to tap “Read write key” and then “Read /Write key via IR”.

Tap “Star programming”.

Choose “Infrared identification key information”.

Insert the key into the infrared antenna of the Key Tool Plus, click “OK”.

Reading key data…

Click on “Continue”.

Choose “Erase the BE key”.

Click “OK” to ensure the key is inserted into the infrared antenna of the Key Tool Plus.

Erase success! Tap “OK”.

Again, go to “Infrared identification key information”, click on “OK” and then “Continue” to ensure FBS3 key info.

Choose “Write BE key”.

Click on “OK” to load the key file to be written.

Enter “20345605” folder and then “key4_23345605_used_051.bin”, then “Open”.

Click on “OK”.

Writing data success.

Please directly insert the activation key into the car to activate. If any problem, please following the on-screen guide to do.

Again, go to “Infrared identification key information”.

Now we have 4 key number.

So let me go put this back in the box, plug everything up and try to turn it back.

So I realized that the key won’t turns unless it’s connected to the vehicle

I’m going to test the working key on bench using Autel MaxiIM IM608.

Operation path: ESI tools -> Test EIS status /working key ->> On bench (G-box) ->> Test Working key ->> Current EIS type: W209/2006.

Please insert the key into the IR keyhole on the programmer (XP400 Pro)

Please insert the key into the EIS and remove the key 3 times.

Please insert the key into the IR keyhole on the programmer (XP400 Pro)

This key is the working key of this vehicle, key version: BE key, position: 4

Alright, the key is programmed.

Perfectly, the new key can start the car.

Here follow 3 questions and answers:

Question: Nice job, but why not completed with the key tool plus only? Those adapters work for the tablet as well.

Answer: I’ve tried that method and the tool doesn’t connect with the adapter after modifying it for the Key Tool Plus. I tend not to deviate from the tool’s original purpose unless I’m experimenting with my own modules.

Question: what about ezs cables do they work with the key tool plus?

Answer: it doesn’t work unfortunately. The adapter cable is not yet released.

Question: Nice! Where did you get adapters?

Answer: Xhorse VVDI Prog Mercedes EIS / EZS Adapters Kit

vendredi, juin 25 2021

How to Add Key to Opel Insignia B 2018 by Lonsdor K518ISE

New test report:

I have successfully added key to Opel Insignia B 2018 with Lonsdor K518ISE. Insignia menu is only for model A, older type – 2016. first i read PIN under menu Astra K. I tried menu Astra K smart key but didn’t work. I made this smart key under menu Chevrolet Camaro 2017-2019 smart key.

If you want to know more key programming tools, please visit our website https://www.obd2tool.com

https://obd2-key-programmer.blogspot.com/2021/06/how-to-add-key-to-opel-insignia-b-2018.html

jeudi, mai 27 2021

Autel IM508 XP400 Adds A Key Iveco daily 2017 by Dump

Test report: successfully add a new remote key to Iveco daily 2017 using Autel IM508 and XP400 Pro. Couldn’t connect via OBD. Done on bench by dump. Take BCM out – read 95640 with xp400pro and add key via dump. Used key KD remote multifunction, generated as Ducato Magneti Marelli pcf7946. BCM is located the left drivers foot. You need to remove one plastic (without screws, only clips) and then remove 6 or 7 screws, which holds BCM. And of course a lot of plugs.

SSOP8 eeprom

Read eeprom by xp400 pro using vvdiprog adapter

How to use Launch Thinkcar Thinkdiag to do Actuation Test

Step by step to use Launch Thinkcar Thinkdiag to do Actuation Test.

Launch Thinkdiag Review: Capacities, Software, Car List

1. Plug Thinkdiag into the obd2 port of car, hear the beeps and see the green indicator light indicating that is connected. We have the engine on for the car.

2. Select “All systems full function”

3. Going to scan the vehicle’s VIN number. About 20 seconds there found the VIN number and we connect to the vehicle.

4. Select “System selection”.

imghttp://cheapobd2tool.com/wp-content/uploads/sites/3/2021/05/How-to-do-Actuation-Test-by-Launch-Thinkcar-Thinkdiag-4.jpg))

5. Body Control Module (BCM).

6. Select “Actuation Test”.

7. Select “Driver window motor”.

8. We can also select “Windshield Washer relay”, so “Active”.

9. Last to show “High beams” active, I see they come one. And activate or deactivate and they turn off .

Okay, that’s the Launch thinkdiag device’s performance.

vendredi, avril 9 2021

Launch X431 Guide Function Steering Angle Sensor Learning B116854 C10ACF0

First come with Launch X431 online guiding function available model, available vehicle, available function, then how to use X431 to troubleshoot B116854 Steering Angle Sensor -No Basic Setting and C10ACF0 Steering – End Stops Not Learned.

Available model:

X431 Pad V, X431 Pro 3, Pad II, PAD III,

Euro Pro4, Euro Tab, Euro Tab2

Torque, Throttle

Available vehicle:

Audi & Volkswagen

Full models

Full system

Available Functions:

A/C compressor first run,

ATF Level Check,

ATF Pressure Reduction/Lock ATF Pump,

Adapt Installation Info (RG. 35),

Adaptation -J104-Tnailer Stabilization,

Adaptation of Turbocharger Offset Correction,

Adapting Diesel Particulate Filter (DPF) Adapt Values,

Adapting injector quantity adjustment to IVA, Adjustment,

Basic Setting Brake Pressure Sensor 1-G201-,

Basic Setting Power Steering Adaptation (RG.48),

Headlamps (RG.94),

Basic setting steering angle sender-G85,

Calibrate J852-Camera Control Module,

Check AC compressor,

Coding,

Basic Setting,

Calibration (RG.44),

Coolant circuit vent routine,

Data ABS control unit-J104,

Fill Up And Bleed Cooling System,

Final control diagnosis ABS hydraulic unit-N55,

Function Test Reducing Agent System,

G251-Longitudinal Acceleration Sensor

Look at the dashboard, it is the steering system fault of one Audi A4 2013.

launch-x431-guide-function-steering-angle-sensor-learning-01 (2)

And this is the two fault codes B116854 C10ACF0 read out by Launch X431 tablet.

B116854: Steering Angle Sensor -No Basic Setting

C10ACF0: Steering – End Stops Not Learned

Next, let’s perform Steering Angle Sensor basic setting with Guide Function.

Hook X431 up to the Audi

Tap “Local diagnose” (or Diagnosis if you have X431 PAD V for example), and then “Audi”.

Tap “Ok” and it will check the Bluetooth connection, then loading, processing…

Select “Guided Functions”.

Select Audi Model -> model year -> version (Sedan)-> Engine -> confirm the vehicle information.

System selection -> System & Variant -> Power Steering -> G85 -Steering Angle Sensor, Calibration.

The system will guide you step by step.

In this program, the following test steps will be performed:

Calibration of G85 -Steering Angle Sensor

Checking DTC Memory of Steering Column Electronic Systems Control Module – J527

Required Auxiliary Equipment:

6458 Steering Wheel Level.

Check the trouble code and delete it.

Path: System selection -> Steering Assistance -> Read DTC -> Clear fault code B116854 and C10ACF0 is not erased.

How to solve C10ACF0 Steering – End Stops Not Learned?

1. Press the brake pedal. 2. Engage gear.

3. Turn full anti-clockwise and wait the sound, 5-10 seconds.

Turn full clockwise and wait the sound, 5-10 seconds.

Turn the steering back to center.

4. Look at Launch X431 pad v tablet, there is no trouble code, are trouble codes are cleared.

Job is done perfectly.

If you want to know more about launch x431 scanner, please click launch x431 test .

chinaobdtool.net/2021/03/26/how-to-get-sdconnect-c4c5-work-with-vediamo-part-w/

dimanche, mars 28 2021

How Do i know when to use Pathfinder SDD or IDS on my Jaguar Land rover Range Rover

1. Which car model to use IDS on ?

Jaguars from 1995 to 2005

2. Which car model to use SDD on ?

Jaguar & Land Rovers from 2006 to 2019+

3. Which car model to use PATHFINDER on ?

The new protocol called DOIP and the new JLR Pathfinder DOIP VCI is the only unit that will be compatible with all JLR vehicles with the new MY17 vehicle architectures. In addition to the 17MY vehicle line applications, the DOIP VCI will be capable of interfacing with 14-16MY Multi-CAN architecture vehicle lines on the Pathfinder diagnostic system.

Some of these pathfinder vehicles listed below

17MY > Range Rover / L405 17MY > Range Rover Sport / L494 18MY > Discovery / L462 18MY > Range Rover Velar / L560 18MY > Evoque / L538 18MY > Discovery Sport / L550 18MY > XF / X260 18MY > XE / X760 18MY > F-PACE / X761 18MY > F-TYPE / X152 18MY > E-PACE / X540 19MY > I-PACE / X590

samedi, mars 13 2021

GlobalTIS & TIS2000 Software Free Download & How to Install

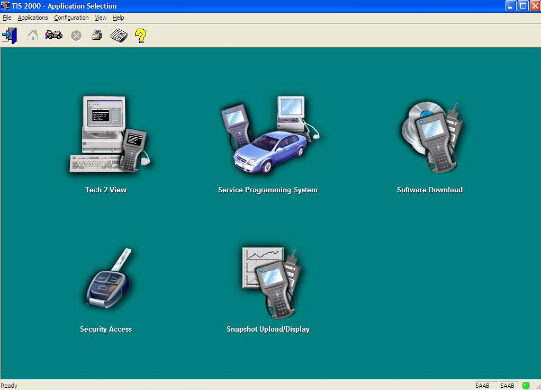
What is TIS 2000 Software?

TIS 2000 is abbreviation of Techline Information System 2000 software application.TIS 2000 is actually a group of serveral programs that perform the following functions:

Service Programming System(SPS) Tech 2 Updating Tech 2 Snapshot Uploading and Analysis

Top 4 Reason to Get GM Tech2 Full Package: 1. Multi-langauge: English, Italian, French, Portuguese, German, Spainish, Korean, Japanese, Thai, Chinese 2. Update: via 32MB Software Card, when there is newer version, you can just buy new card to update 3. Support Car Models: GM, SAAB, Opel, Suzuki, Isuzu, Holden

Software Listing : GM GM-English 33.004 1991-2014 GM-Spanish 33.002 1991-2014 GM-Germany 32.007 1991-2013 GM-Japanese 32.006 1991-2013 GM-French 32.007 1991-2013 GM-Italiana 32.007 1991-2013 GM-Portuguese 32.002 1991-2013 GM-Korean 32.002 1991-2013 GM-China 32.002 1991-2013

OPEL OPEL-English Newly Update to V180 1997-2014 OPEL-Italian Newly Update to V180 1997-2014 OPEL- Polski Newly Update to V180 1997-2014 OPEL- German Newly Update to V180 1997-2014 OPEL- Turkish Newly Update to V180 1997-2014

GM Tech2 Card Opel Software Update to V180 Support Cars from the Year 1997 to 2014

SUZUKI SUZUKI-English V01.210.020

SAAB SAAB-English V148.000

ISUZU ISUZU-English CAN-BUS V180 2006-2015 (CAN-BUS support car models after 2010) ISUZU-English K-Line V11.680 1996-2014 (K-line support car models from 1996 to 2014)

Holden Holden-English  V149.000 1999-2013 (For North American Area Only) Holden-English V147.000 1999-2012 (For Australia)

4. Year Coverage of Diagnosis: From 1992 to 2013, With Help of Tis2000 Software, It Can Do Programming for Cars Before Year 2007 5. Package light and easy for carry.

Global TIS 2000 Software Free Download:

TIS2000 Software: http://www.mediafire.com/file/bc92by7ao7fp1la/GM+2000NAO.7z

TIS 2000 Dongle Crack Download: https://rapidgator.net/file/a081c4c028aa1fb80ea98e15a540b9a9/TIS2000_Dongle_Crack.7z.html

Opel-Vauxhall TIS 2000 v96 Multilanguage

Opel-Vauxhall TIS 2000 v116.0E Multilanguage O.S.: Windows XP; Windows Vista; Windows 7; Windows 8 – CPU: Pentium/Athlon 1 GHz or higher – RAM: 256 MB of system memory – Hard Drive: 5 GB of available space – DVD-ROM

https://mega.nz/#!K8Vz1I4S!AFnVYQCst3VqNTCmSTuwE4B-lw87wJR3gz547bnwETQ

Opel TIS 2000 Download: https://kitorrent.com/opel-tis-2000-dvd-t1309837.html

SAAB Global TIS Free Download: https://mega.nz/#F!ut9kCK5S!v6XY8ROGHR_TJISdGr0BAA

SAAB GlobalTIS 1.2010:

http://cartechnology.co.uk/attachment.php?aid=10129

SAAB GlobalTIS1.2010 Activation:

http://cartechnology.co.uk/showthread.php?tid=1457

Opel GlobalTIS V32B:

https://mega.co.nz/#F!rloGUAha!-hBJWlK9iuIy-i6LCDRjAQ

PASS: cartechnology.co.uk

The support Languages they are ONLY these: – Italian – German – French – Dutch

TIS2000 Software Installation Guide:

Method 1: A lot of info I found over at SaabCentral but it is just a giant thread to read through although a lot of the info is on the first page. And a lot doesn’t apply since it’s geared towards Saab (even the 9-7x doesn’t apply, it’s under GM).

So you have a Tech2 but a lot of the things you would like to do is locked out because you don’t have access to the computer software to allow you to do it. Things like updating PCM’s and modules and anything security related are locked out. If you bought one of the Tech2 clones, it probably came with a CD with the Tis2000 software. If you install it and try to use it, it says that it can’t find the USB security dongle or something like that. That’s because only dealers have those or a clone of one wasn’t included.

First of all, this is old software. It was discontinued in 2008 by GM which means that it works only for vehicles up to model year 2007. It will have PCM and module updates included. For example, I was able to update all of the modules and PCM in my 2006 9-7x even though it had only been a year or two since production and issue of this software. It will also allow you to reprogram a module that you are replacing.

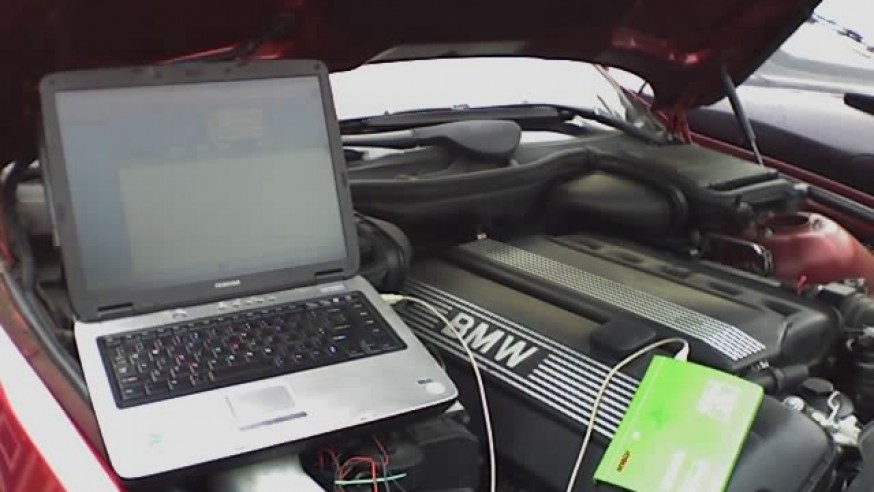
The Tech2 communicates with the computer using a serial port on the computer running Windows XP SP3. This can be a problem if you only have newer computers. Best and easiest scenario is to use an older laptop computer that has a serial port running windows XP. In my setup, I used an old IBM T40 laptop, which is fairly decent processor wise, installed a fresh copy of Windows XP SP3 and used a docking station with it that has a serial port. Laptops that have actual serial ports built in are probably so old that they are too slow or have age and reliability issues. Another solution would be to get a USB to serial port adapter and specify the proper COM port number during the install of Tis2000.

Another possible solution would be to use a virtual environment on a host computer. VMWare is free to use and it has been done from what I read but could be a fairly involved process because of the serial port issue, especially when using a USB to serial adapter. The challenge of communicating from the virtual environment through the real computer’s hardware ports can make it difficult but can be done. I’m not going to discuss this type of installation but the basic software installation and use will be the same. If anyone gets a virtual install working, please post it up.

In some detail, this is what I did. Keep in mind that you should have some computer knowledge and know how to install Windows.

1. Installed a fresh copy of Windows XP SP3. I didn’t bother with updating anything else as far as security updates to Windows or install a virus scan because this computer will never be connected to the Internet or used for anything else.

2. Installed ALL the required drivers until there were no more yellow check marks in Device Manager. I failed to do this at first and caused a lot of headaches later, including a BSOD during software installation.

3. If you’re using a USB to serial adapter, plug it in now and set it up. Go into Device Manager and make note of the COM port used by the adapter.

3. Install the Tis2000 software from the CD included with the Tech2. During the install, it will ask you to specify the COM port. If you have a serial port on the computer, it’s probably COM 1 or use the one from the USB adapter.

4. Before you can use Tis2000 with your gm Tech 2, you have to make it “think” that there is a dongle connected that authorizes it. You can download the crack below. Follow the read me file for instructions on how to use it.

That’s it. More threads will come explaining how to do stuff with it but this will get you going.

And if you need them:

TIS2000 Software(Extracted from my CD)

Tis2000 Dongle Crack When you click on the links, they will bring you to 4Shared, click on “Free Download”, a little window will pop up asking to log in using either a social media account or sign up for an account. Sign up with an email and password and then create a name. After that, you will be brought back to the download page and the 60 second timer will count down, after which the download will start.

Warning: In Tis2000, whatever you do,DO NOT USE THE “SOFTWARE DOWNLOAD” BUTTON!This will retrograde the card in your Tech2 to an old version from 2008.

Some more install info, especially for VM’s, is also available in this thread from SaabCentral.

Method 2: Insert TIS2000 software CDinto the laptop 2) Install the setup driver in the CD 3) Select Activator. Select first one Activator hardware key 4) Load DATA DVD (tis2000+data+0802) to run TIS200 on desktop after compete install the setup. TIS2000 will update the data automatically. 5) Find out and locate SuperPro.dll file in TIS2000 crackfile folder after update data and copy the SuperPro.dll file to “C:Program filescosidsbin” 6) Then run TSI2000 software 7) Connect GM Tech2 device with computer 8) Start ECU programming and follow the windows prompts.

If you order GM Tech2 scanner with Saab software, you’d better choose Saab TIS2000 CD with USB key.

Opel GlobalTIS V32B Installation:

1.Mount the .iso for to install GlobalTIS and during installation click in all windows “Next”! DO NOT CHANGE anything and leave all AS THEY ARE! 2.When installation finish, 1st DISABLE any Firewall that you have all ready enable! (EVEN and Windows Firewall!) 3.Run the GlobalTIS and go and FILL Dealer info form (anything you wish…) BUT FULL filling! 4.Save your Dealer details 5.ATTENTION!: Request key by: E-mail/Fax and it will generated one Registration.pdf file 6.Save somewhere this .pdf file 7 .Log-off now from GlobalTIS & CLOSE it 8.POST HERE on this Thread your Software Key or your .pdf file 9. Wait to receive your Subscriber ID & your License-Key 10. When you receive your ID & your Key, run the GlobalTIS fill your details and Click Activate 11. Click “OK”… 12. Install now the apearing & needing Plugins!

Anthony1s’s method to install TIS2000 for any computer

64-bit versions of Windows contain backwards compatibility with 32-bit applications, but not with 16-bit applications. And 32-bit versions of Windows are backwards compatible with 16-bit applications. The problem with installing TIS2000 on newer machines is that, while the TIS2000 program itself is 32-bit, the installer and drivers are 16-bit. Therefore, you are able to install TIS2000 natively on ANY 32-bit Windows system. This will just work, without having to run anything in compatibility mode.

However, if you have a 32-bit copy of Windows 8 installed (I don’t wanna know why you do), running 16-bit applications are disabled by default. You can enable it by going to Control Panel and clicking on 16-bit Application Support then clicking Enable.

For those of you with genuine copies of Windows 7 Professional, Enterprise, or Ultimate with a multi-core processor (who doesn’t run Win7 on a multi-core these days); these versions of Windows 7 allow you to use Windows Virtual PC, which lets you virtually run Windows XP Pro without a disc or OS installation. You need to install Windows XP Mode and Windows Virtual PC in order to use it. Before you can download these updates, M$ makes you run a little .exe that checks if your OS install is legitimate. Anyway, after you get that all installed and XP Mode is booted, you can copy the OP’s cracked TIS2000.zip over to the WinXP Desktop and follow the README.txt inside to install it. Here is a link to the thread with the cracked TIS2000

http://www.saabcentral.com/forums/showpost.php?p=2435898&postcount=1

I have tested this on my desktop running Windows 7 Ultimate 64-bit and the cracked copy of TIS2000 the OP posted installed and ran with no problems. Instructions for Win7 XP Pro virtualization mode here:

https://support.microsoft.com/zh-cn/products/windows

Now to the most common problem. If you are running a 64-bit version of Windows XP, Windows Vista, Windows 7 Home Premium or lower, or ALL versions of Windows 8 and 8.1, I guess any version of Mac or Linux too, you have a couple of more involved and more risky options…

You can obtain a legal copy of Windows 2000 or XP Pro 32-bit on your own. It includes two programs for making a bootable CD or USB drive. Pop the bootable device you created into your laptop, reboot to the device, then install that operating system onto a seperate partition of your hard drive, or a different hdd altogether. Or you can install Virtualbox (free software), and run the cracked Windows copy via a virtual machine… The method I took to test this was to create a separate partition on my ssd and install it there. When the computer reboots, it will ask you what OS you would like to run. Select Windows XP Pro, then continue installing TIS2000. If you’re gonna be writing to the main drive on your computer, I suggest first creating a bootable USB with Clonezilla on it and creating a drive backup with that

http://clonezilla.org/downloads.php

This allows you to make a complete backup image of your hard drive, and allows you to flash it back to that drive at any time. A good thing to have around anyway.

I do not have a Tech 2 device and am unable to test that everything is working with any of these methods. However, I see no reason why these solutions will not work with a RS232 to USB Convertor on any computer you may have without a serial port.

GlobalTIS FAQs:

A1:how to install and use the keygen for globalTIS?

Q1:Just did this – everything you need is in the “global tis keygen.txt” file that comes inside the crack rar. However – Run the gtis install. It’ll prompt you for a dealer ID. I don’t think it actually matters, but I googled “Saab dealer ID” and used the six digit number I found… maybe 218599? Whatever. After you install it, run it and it will prompt you to register. Fill out all the dealer information (fake info…) and make sure you select register via fax. It will spit out a PDF – save that on your desktop or whatever then exit gtis. Copy the keygen files into the gtis webserver folder – normally /program files/globaltis/tomcat/webapps/tis2web/web-inf/lib Open the PDF file you saved to your desktop and get the software key number – it’s really long with a bunch of hyphens Open a command prompt, go to the gtis webserver folder, and run keygen.bat followed by that long software key number – REMOVE ALL THE HYPHENS. It’s great to type keygen long number > regcode.txt so that the output of keygen gets put in regcode.txt so it’s easy to copy and paste. Fire gtis back up and it will continue the registration process. Open regcode.txt – there will be a short number and a long number. Cut and paste them into appropriate boxes in gtis. That’s it…

vendredi, mars 5 2021

Setting up VCx/MDI/Tech2win

I found this very good description of getting things setup and running, and thought I should share. I make no claim of writing it! Just re-formatted for easier reading. :smile: ——————– Before you begin, make sure you do NOT have the VXDiag hardware you bought from ******* connected to the computer!

1) Install the VM software “VMware-player”. Accept all the defaults. Be patient and let it finish. If it asks to reboot, do it. Also, never open the VMWare program itself. This is just installed with an image file that the other software accesses behind the scenes. All of the software you install will be installed on your normal Windows PC, NOT in the VMWare instance.

2) Install the VX software “VX Manager” (the VX software is for the diagnostic connector that connects to the car, and takes the place of GM’s MDI). You may get an error about a missing “MDI driver”. That’s fine. Just ignore it. Again, be patient and let it completely finish the install.

3) Install Tech2Win. It is located in the “Tech2Win” folder and named “AutoInstall”. Again, be PATIENT. Let it finish. (This also installs the GM MDI driver for you)

4) Connect the USB cable to your PC and the VXDiag hardware you bought from Amazon. Now wait for it to find and auto install the driver for it. It will scan windows update, and for me this part of the install took almost 45 minutes for whatever reason. You can’t move to step 5 until this is completed.

5) BEFORE you open the Tech2Win program you just installed, you must first open and run the VX Manger software with the VXDiag hardware connected to the USB, so the VX manager recognizes it (if you do not do this FIRST, the Tech2 program will not be able to locate the interface in the next step, and will display “no communication”.) The VX Manager software will open and say it is connected. If this doesn’t happen, you made a mistake in the previous steps.

6) With the VX Manager still running, open the Tech2Win application you installed, it will automatically open via a virtual machine on your computer passively, there is nothing you need to do with the VM software (this is also why you can use the software on a 64 bit computer).

7) Once the Tech2Win application opens it will ask you to “please choose an option”. Make sure the radio button next to “start” is selected, and below that click the corresponding button for your car make/model (for my Pontiac I used “North American”).

8) At this point it will ask you to “Select Manufacturer”. I had 2 options. Choose the first one for the “GM MDI” (this is NOT an MDI2 connector). Then it will ask you to “Select the interface you want to use”, you should only have one option if you are connected via USB, so select the USB connection.

9) Now you can connect to the vehicle and begin polling data.

A couple of tips:

  • Your car needs to be running for it to pull all of the data it needs.
  • The 3rd digit of your vehicle’s VIN is the letter you want for your vehicle’s “product line”.
  • If you have any issue with the Tech2Win software doing a connection timer count, or saying the CANdi module isn’t installed you chose the wrong options, or the VXDiag hardware isn’t properly connected to your car’s ODB2 port. You can also enable/disable CANdi emulation in the Tech2Win program under “options” on the main blue screen.

dimanche, février 14 2021

Restore ECU DeadKilled After Flashing with UNKN 0000 Error

For a beginner of BMW flashing/programming by E-sys software,sometime you maybe find some control modules dead or killed without communication,it show UNKN 0000 error.So here Obd2tool.com show you guide on how to restore it.More about BMW E-sys cases,please check it here: BMW Trouble Repair

Preparations:

BMW E-sys 3.33.0/3.32.1/3.30.01 Coding Software Free Download

Procedures:

After ECU dead,it show UNKN 0000 on E-sys,and it can’t be communicated

Now we need to edit SVT again to restore it.

Open below window,and click “Calculate” to locate SVT target file,and then click “Edit” button to edit

Open sub-options to locate dead ECU file

Right click “UNKN 0000” and click “Delete”,then save the modification

Click “Calculate” button marked with 5,and save it.

Check the four boxes with IBA file,and for other only 3 boxes checked

Access to forced flashing/programming status.

Then click “Start” button to programming,after then ECU will restore communication.

What is the difference between X431 v+ and the launch pad ll

Original Launch X431 PAD II new high-end Android professional diagnostic scan tool comes to replace X431 Pad I, X431 V (X431 Pro) and X431 V+ (X431 Pro3). X431 PAD II comes with dust and waterproof design (IP65), including docking station for DBSCar, EasyDiag and golo Full system diagnosis for more than 70 brands; access to all available vehicle systems; coding, programming (key, immobilizer system) and service reset.

Launch X431 Pad II vs. X-431 PAD vs. X431 V Pro vs. X431 V+

Conlusion: launch pad ll is powerful than X431 V+ But X431 V+ cheaper than X431 PAD2.

jeudi, février 4 2021

How to fix the CAT ET SIS error #142 – requested baud rate is invalid

This means you have communication error between your CAT II / III adapter and the CAT ET Software setup. Usually it is a simple fix.

– In the CAT software go to UTILITIES => PREFERENCES => COMMUNICATIONS – CHOOSE: CATERPILLAR COM ADAPTER II – CHOOSE under PORTS: COM 7 – Click “OK” – Restart the computer and usually that is all you need to do.

But if the above steps do not work, then your adapter is setup on a different COM PORT. In which case watch the video below on how to find which com port your Heavy truck scanner CAT II / III (317-7485 or 317-7484) adapter is using and match it with the CAT ET SIS software to fix the CAT #142 error message.

- page 1 de 7